


There are so many beautiful and useful stitches out there it’s impossible to know them all, but the appropriately named Thermal Crochet Stitch is definitely on the list of stitches that are amazingly good to know. Especially if you need some extra insulation.
If you don’t live in a cold climate you might think you have no use for it, but I submit that this stitch is good for anyone that doesn’t like burning their hands!
There are two types of thermal stitch the single crochet and the double crochet. The thermal stitch in both cases is a one row repeat that is reversible which is always nice. It is a little bit fiddly when you first start the stitch and it is definitely going to take a couple rows to get used to the single crochet version.
Single crochet version
Is much better for smaller projects, it is rather expensive both in time and yarn. However, it is a beautiful stitch and you can’t help but be proud of the investment once you’re done.
Double crochet version
This version works up surprisingly quickly and is twice as thick and the single crochet version. It definitely seems to use less yarn and makes a wonderful squishy texture. If you’re wanting a garment or large project like a blanket I would definitely use this one for it. However it will take a lot of yarn and while the progress is definitely faster with this version it will take a while.
Why is it a time/yarn investment? Because you are essentially crocheting both sides individually.
Supplies
- Big twist yarn color: soft grey or any worsted weight yarn (4)
- Size J 6mm hook (a K 6.5mm hook will work too)
- Yarn needle
Abbreviations
- st = stitch
- ch = chain
- Sc = single crochet
- Dc = double crochet
- Fl = front loop
- Bl = back loop
- t = turn
- <> = number of total stitches
- Ins = insert
- YO = yarn over
If you need a basic stitch tutorial click here
Single Thermal Crochet Stitch Tutorial
These instructions are for a swatch.

Row 1. Make your starting knot and ch 11.


Row 2. Turn your work over and find the back ridge of the ch. You will work 1 normal sc into each of these. <10>


Row 3. Do not turn your work. Ch 1, ins hook into the loop closest you and the fl from the ch row, pull up a loop, YO, pull through both loops. Repeat 9 more times. <10>

Row 4. Ch 1. Ins hook into the loop closest you and the Fl from the previous row, pull up a loop, YO, pull through both loops. Repeat 9 more times. <10>

Row 5- 11 repeat steps in row 4.<10> Once you can comfortably hold your work the higher side will be what faces you and you will work into the back of the rows. The top loop that you’ve been working into are back loops. The loops from the previous row that you pick up are front loops.


Row 12. This is a finishing row. Ch 1, ins your hook into both top loops and the Fl from the previous row, pull a loop through 3 loops, YO, pull through both loops. Repeat 9 more times. <10>
Weaving in your ends

Cut your yarn and weave in your ends. The swatch is done! I have an in depth tutorial on The Crochet Basics: How To Weave In Ends.
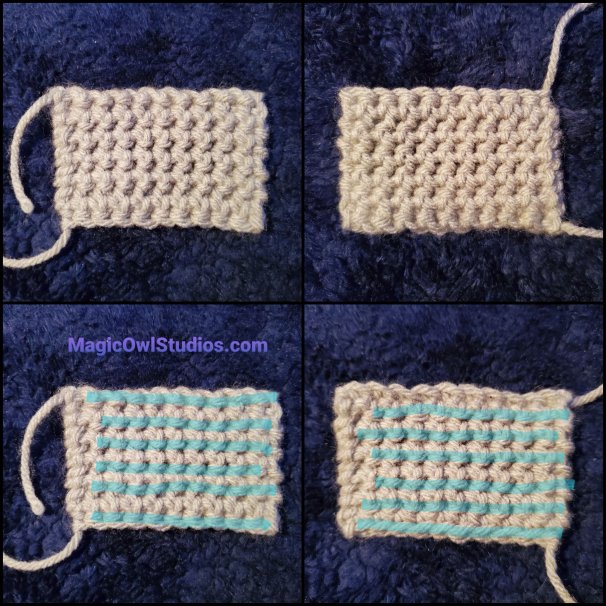
It is very easy to miss the last stitch which is why you should count each row to ensure you have the right amount. This is what it looks like if you miss a stitch on the end.

To know how many rows you have count these dashes on both sides. They are highlighted in blue
You can make this stitch with any number of chains and as tall as you like. It makes a wonderful pot holder, the picture below is of one I made with 100% cotton yarn. I used Peaches & Creme in the color dark grey, you can use any color you like of course, but make sure you use 100% cotton because polyester and acrylic will melt in high temperatures.
To give some perspective, it took me over two hours to make. It is 21 stitches across and has 41 rows.

Yarn prices and buying tips
Peaches & Creme is one of my favorites for cotton yarn, I’ve found it at Walmart for $1.70.
The Peaches & Creme cone, 706 yards, at Walmart is regularly $8.44
Lily Sugar’n Cream is a wide spread brand for cotton and if you prefer to use amazon*, the bulk buy of 6 is the best price of $20.50 for 720 yards total, about $3.42 120 yards each.
The Lily Sugar’n Cream cone, 706 yards, is typically a bit cheaper this one is yellow* and is $10.49 at this time.
The normal craft store price for Lily Sugar’n Cream is $3.99 for 1 skein of 120 yards. If you just want one than a coupon can make it 2.39 with a 40% and 1.99 with a 50% providing there are no sales when you’re getting them.
The normal craft store price for the Lily Sugar’n Cream cone is $14.99, if you can catch a good coupon 40% off would make it $8.99 and 50% off would make it 7.50.
If you have a Hobby Lobby near you they have a brand called Crafter Secret that has a 100% cotton with a 95 yards for $2.29 regularly and they frequently have 30% off sales that make it $1.60 a skein.
There are plenty more cotton yarns out there, but these are the ones I’ve used and can recommend
(*this is an affiliate link that gives me a small percentage when you make a purchase at no cost to you, this helps me keep my site add free!)
I’ll be doing the double thermal stitch next week!
I hope you liked learning the Thermal Crochet Stitch and found it helpful! If it was, please show your support by liking this post and following my blog, so you’re alerted whenever I make a new one. You can also sign up for The Crocheting Owl Monthly Newsletter for free patterns, updates, yarny bonuses, and more!
Subscribe to my newsletter!
What are you thinking of making with this stitch? Have you used it already? Let me know in the comments!