


I’ve been crocheting a while now.. But there is so much I still don’t know! There are so many stitches and methods of crocheting with more being discovered all the time. So, I decided to share my favorite 6 Tips to Improve Your Crochet Projects can help crocheters of any stage!
1. How to make a magic circle
There are loads of interesting patterns that start in the round with a magic circle. I find this foundation stitch to be indispensable in my crochet repertoire for anything from granny squares to amigurumi.

To start a Magic circle, wrap the end of your yarn around two fingers twice. Spread the two fingers, take your hook and pull the strand closest to your palm up as a loop. Yarn over and pull through this is a chain.
I have 3 chains in the last picture because this was my crochet hearts, which are a great quick project to practice Magic Circles on.
Foundation Row : Make a MC with (however many) single crochet inside, pull the tail tight to close it and slip stitch into the first single crochet to join the round.
For a more in depth tutorial, check out my post on: How To: Make A Magic Circle Crochet Tutorial (Or An Alternative)
The single crochet can of course be traded out for whatever stitch your project calls for.
2. Change colors seamlessly and with less weaving in ends!
Color changes can be a pain at best and daunting at worst, but I have a simple method that works every time.

Step 1. When you’re ready to change colors, take your new yarn color and make the last pull through of the previous stitch the new color, with the yarn tail coming from the side you’re working towards.
Step 2. Crochet normally making sure your new tail is being covered by your stitches.

I use this method every time I change colors, whether it’s mid row or new row, it even works in the round!
3. Crochet straight edges

We’ve all had the struggle of the sides of our project going wavy, this is usually caused by the chain ups we do to achieve the correct height for half double crochets or taller, followed by the actual half double crochet or taller, in the same stitch. If you happen to use the, count the chains as a stitch, method you end up with odd holes in your work from the chains not being thick enough..
I’ve got a solution for you. This method is for double crochets and half double crochets, I’ve not had any issues with single crochet having wonky edges, if you do tell me in the comments and I’ll see if I can help you.
This pattern is for a 10 st by 6 row swatch using a J/6 mm hook and Red Heart super saver yarn in Minty
The straight edge crochet tutorial
Foundation row. Chain 11.
Row 1. Yarn over and insert your hook into the 2nd chain from the hook, make a single crochet, you should have 2 loops on your hook, yarn over and pull through both, that is your completed first stitch. Continue to make normal double crochets for a total of 10.


Rows 2-3. Chain 1 keep it loose, yarn over, make a single crochet, you should have 2 more loops on your hook, yarn over and pull through both.
Continue to make normal double crochets for a total of 10.

Rows 4-6. Chain 1, yarn over, insert your hook into your very first stitch, pull up a loop, yarn over and pull through all 3 loops, continue to make half double crochets in each stitch for a total of 10.
Once you’ve finished that last row, snip the yarn and use the needle to make a finishing knot by inserting the needle into the top of the last loop and pull it taught.
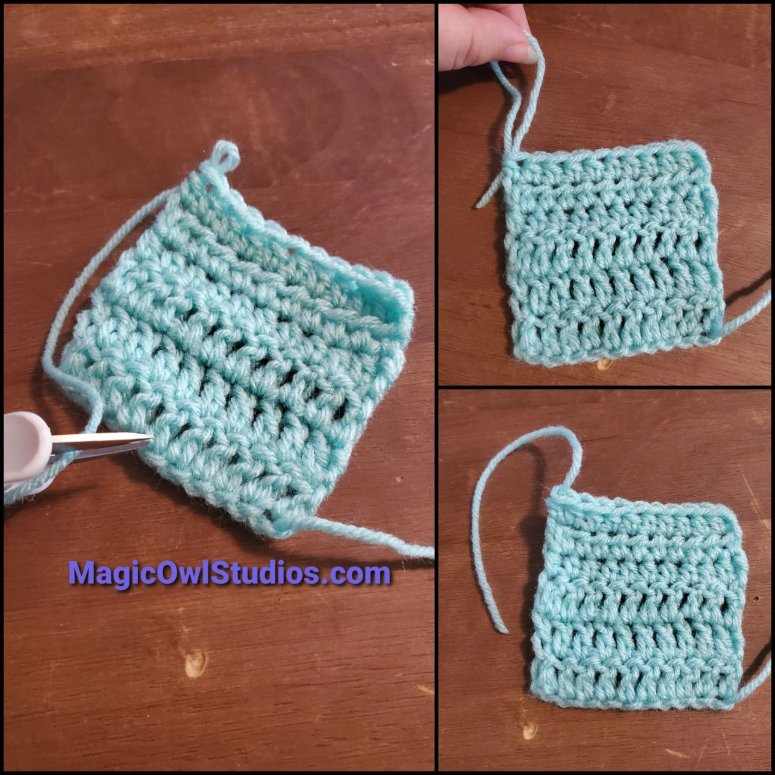

Next weave in your ends using a yarn or tapestry needle.
Insert the needle in between your stitches to secure them and snip the extra tail.
That’s it! Simple right? You get straight sides and no weird gaps in your work. The only way you can get it smoother is to block it, but that’s another tutorial.

4. Picking colors for a project

This is something I’ve only started to do recently, but I’m very happy with it.
Go on your favorite search engine (I use Pinterest instead) and type in color palettes or color schemes. You will be greeted with a beautiful array of color combinations that will make your creativity soar!
Some of them come with a picture that shows where the color inspiration comes from. This can be especially useful if you dye your own yarn.
If you like the examples in the photo, this is a link to the color scheme board, I’m always adding more to it.
5. Keeping a straight seam in the round

When you’re working in joined rounds there’s always a slip stitch into the first stitch. In most projects, you’ll find the join moves over one stitch on each row.

This, however, doesn’t have to be the case. Instead of crocheting in the next stitch after you chain up, work your first stitch in the stitch below the chain. This allows you to make a straight joining seam.
I use this kind of seam in my amigurumi octopi pattern if you want to try putting this to use!
6. Making yarn softer
I like using some of the cheaper acrylic yarns, like Red Heart Super Savers and store brands, buy they aren’t always the softest of yarns. Let’s be honest $5 or over yarns just aren’t always in the budget. Especially when you need a lot of it for a project, or you just like to have lots of colors on hand.
My trick for making a finished crocheted item softer is to soak it in cold water with vinegar. If it’s a smaller piece then 2 tbsp of vinegar to about 4 -6 cups of water will work just fine. If it’s a big project then you can fill a bath tub with water and add about 1/4 cup of vinegar. Soak for at least an hour, overnight is okay, and wash in a washing machine with cold water and dry on low.
Another method is to use fabric softener in the wash, as long as the yarn can be put in the washing machine. Make sure you check your labels!
This method is for finished yarn products, not for skeins, hanks, or balls.
I hope you found this helpful, please show your support by liking this post and following my blog, so you’re alerted when ever I make a new post!
Let me know if you are going to try any of these or of you have a tip of your own share them in the comments! I’d love you hear from you.🦉😊
If you liked this post on 6 Tips to Improve Your Crochet Projects then, you might like my monthly newsletter. Every month I share a joke, a book recommendation, a new subscriber only pattern, and exclusive coupons for my premium PDF pattern in my etsy shop. You’ll also get updates on what’s coming up in the future. You can join and become a Stitchcrafter, what I call my subscribers, right here:
Subscribe to my newsletter!